- Author admin leonars@hobbygardeners.com.
- Public 2023-12-24 06:09.
- Last modified 2025-06-01 06:02.
Boxwood impresses in beds and containers with its dense, evergreen foliage. Buxus tolerates frequent pruning excellently, which makes the deciduous shrub ideal for formal hedges and green garden sculptures. This tutorial explains in detail when and how to properly cut boxwood.
Variety of cutting types - table with all options and dates
Boxwood has played a key role in garden design since the Middle Ages. Legendary gardens, such as the Palace Gardens of Versailles, would be lacking an atmospheric accent without boxwood. The evergreen all-rounders are still useful today as decorative bed borders, creative garden figures or majestic privacy hedges. The following table includes all types of cuts with information on the best dates:
| Cut style | Target | Appointment option I | Appointment option II | Appointment option III |
|---|---|---|---|---|
| Plant cutting | dense branching, compact shape | after planting | a year later in March/April | none |
| Hedge pruning | Raising an opaque hedge | March/April | June/July | August/September |
| Hedge maintenance pruning | Maintaining shape and vitality | April/May | June/July | August/September |
| Geometric topiary | Designing a boxwood ball | April/May | June/July | August/September |
| Rejuvenation cut | Revitalization and reconstruction of solitaire and hedge | February to March 1st spread over several years | none | none |
Background
Federal Nature Conservation Act has priority when it comes to cutting time
The good pruning tolerance of boxwood allows for more frequent pruning than you would expect from other garden shrubs. It is your horticultural decision to prune your boxwoods beyond the specified dates. As long as the amount of cutting is limited to this year's growth, there are no restrictions on the number of cutting measures. However, when making thinning and rejuvenation cuts, the regulations of the Federal Nature Conservation Act must be observed. Thinning out dead wood, radical cutting and planting is only permitted on trees from October 1st to February 28th.
Pruning in two stages for a dense foliage
If you purchase boxwood as an inexpensiveroot productorhardly branched pot product, we recommend pruning twice. The uncomplicated cutting method aims to ensure that evergreen Buxus bushes thrive with dense bushes at the base from day one. The positive effect has the same effect on a solitary shrub and a hedge. If a box tree finds its way into your garden as a richly branched container plant, this type of pruning can be removed from the care program. This is how plant pruning works correctly:
- The best time for the first stage is after planting or the following spring
- The best date for the second stage is in March/April of the second year
- Disinfect sharp boxwood or one-handed secateurs with alcohol in advance
- Cut all shoots back by half, as shown in the picture below
- After a year in March/April, halve thelast year's growth
Planting pruning takes advantage of the growth law of top promotion to motivate boxwoods to branch densely at the base. By nature, the plant juices strive vehemently towards the top buds to promote growth towards sunlight. This strategy is at the expense of the base of the shrub, which branches sparsely without pruning. By cutting off the top buds every 12 months, the nutritious sap pressure is distributed to the lower regions, causing increased growth.
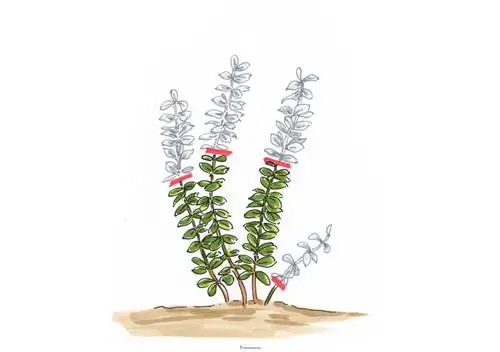
After planting boxwood as a solitary plant or hedge, shorten all shoots by half.
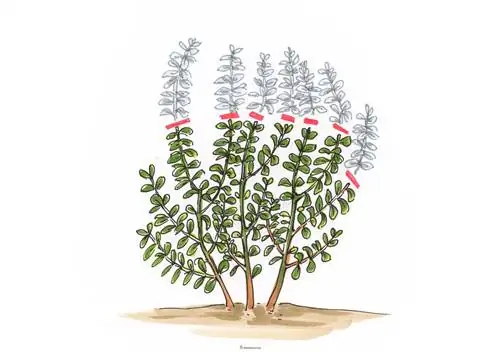
One year after planting, cut back all branches again to promote dense, bushy growth from the base.
Build a box hedge systematically - this is how it works
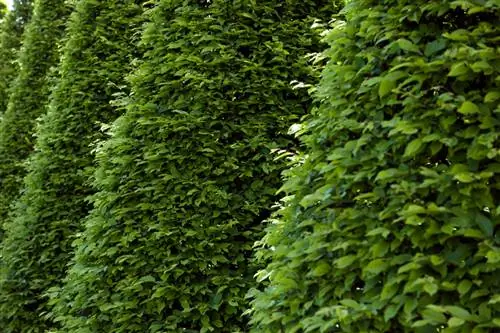
Most home gardeners would not immediately recognize an uncut boxwood hedge as such. Only acontinuous pruning care elicits a homogeneous contour of fine foliage from the evergreen shrubs. As already introduced with planting pruning, the aim of a gradual pruning is to train Buxus into a well-formed border or opaque green wall from the base to the top of the hedge. This is how it works:
- Cut back the boxwood hedge twice a year
- With each cut on the shoots, leave a few centimeters of the previous growth left
- In total, build an annual height increase of 5 to 10 centimeters
- Align the cutting guide to a trapezoidal shape with a wider base for light-flooded growth
The gradual structure slows the flow of sap towards the top buds and directs a large part of the nutrients to the side branches. It will undoubtedly take longer to reach the desired final height if you include at least two of these stages in the training phase. You will be rewarded for your patience with a reliably dense box hedge. This is even more true if you follow the recommendation of this tutorial and give your hedge alight-flooded trapezoid shape. Where the sun's rays penetrate deep into the interior of a Buxus hedge, photosynthesis is carried out diligently for the vital growth of densely leafy branches.
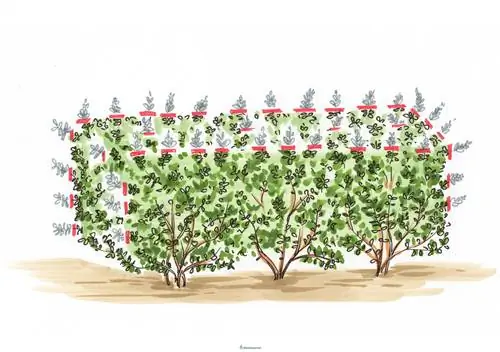
Every time you trim the hedge, leave the branches a few centimeters higher. Measure the cutting circumference so that the boxwood hedge gains a net height of 5 to 10 centimeters per year.
Excursus
Cut boxwood electrically or by hand?
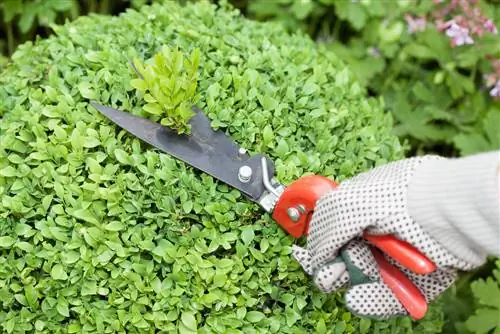
The rule of thumb when purchasing the right cutting tools is: the more detailed the cut, the shorter the cutting edges should be. Maintaining a large hedge is easy with a conventional electric, battery-operated or two-hand hedge trimmer. The artistic topiary, however, requires the use of special boxwood shears with short blades, which you can purchase as electric, cordless or hand-held shears. Topiary luminaries use sheep scissors, whose precise cut is ideal for all fine work. Important for all boxwood shears are freshly sharpened blades, which you should carefully clean before and after and disinfect with alcohol.
So boxwood hedges remain a feast for the eyes
Once the desired final height is reached, pruning care is usually reduced to one maintenance pruning per year. Gardeners with a penchant for accurate boxwood hedges use hedge trimmers up to three times a year. To ensure an even cut without brown spots, please do not cut into the woody shoot area. In principle, a small piece of this year's non-woody growth should remain. This is how the exemplary hedge maintenance cut works:
- The best time for the one-off cut is on St. John's Day, at the end of June
- Conduct maintenance pruning with dead wood thinning by March 1st, in accordance with the Federal Nature Conservation Act
- Tighten the cords in advance as a guide for a conical cut shape
- Spread foil or old blankets under the hedge to catch the fine clippings
- Put on gloves and safety glasses
- Check all safety measures on the motorized hedge trimmer
There are no firmly cemented guidelines for the sequence in which the incision is made. As you gain experience, you will determine whether you prefer to start with the sides of the hedge or the crown of the hedge. There is also controversy among home gardeners as to whether the scissors should work their way from the base to the tip or vice versa.
Tip
Do not prune boxwood in rainy summer weather. The combination of moisture and heat attracts fungal pathogens. If necessary, postpone the cutting date, which is easily possible given Buxus's cutting tolerance. If pruning is carried out in sunny, dry weather, cover freshly cut shrubs and hedges with a shade net. A cut exposes older leaves that quickly become sunburned.
Step by step to the perfect boxwood ball - instructions for topiary
The topiary for the boxwood ball is the ideal project for beginners. When planting in beds and pots, you direct the growth into the desired spherical shape. A gradual training process results in a stable, densely branched bush. You can create a helpful template using a cardboard stencil. How to proceed step by step:
Make a stencil
- Measuring the diameter of the box ball
- Subtract the intended length of the cut (usually between 3 and 5 cm on each side)
- Subtract the value of the quantity to be cut off from the diameter
- Draw the determined radius as a semicircle on a piece of cardboard
- Cut out the circular arc with sharp scissors
- Fix the template to a stick with adhesive tape or wire
Topiary cutting with template
- Place the stick with the finished template in the middle of the boxwood
- Position so that the template can be rotated
- Cut off the shoots along the edge of the template with box scissors
Make the appropriate template in proportion to the growth. As the illustration below illustrates, thesuccessive structure creates a stable, densely branched boxwood ball. You can use the template method to cut the spherical growth form for each phase of training.
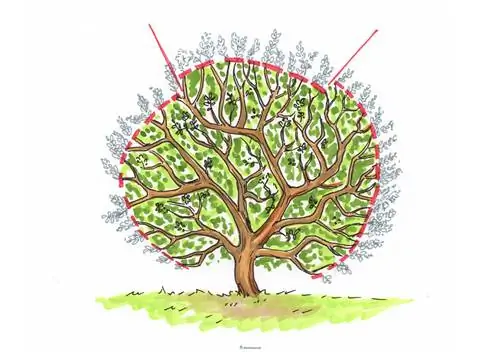
Build a boxwood ball step by step. Numerous branches form at the interfaces. This strategy creates a stable tree that will not fall apart even under snow pressure.
Kegel training with strings - it’s that easy
Also use the template strategy when forming a boxwood cone. Already during the development phase, train the shrub into a cone. Strings with knotted pieces of wood that you stretch between the tip of the central shoot and the ground serve as orientation. An angle of 60° or larger prevents a squat appearance. When cutting the cone shell, look at the plant from above.
From cone to spiral - this is how it works
In the finished boxwood cone, mark the spiral-shaped depressions with a wide ribbon, which you will follow with the scissors for the final cut. When making the cone cut, measure the circumference of the cut so that you are still within this year's shoot growth when you cut the spiral shape. At the end, remove the marking tape and your self-designed boxwood spiral is ready.
Excursus
Using stencils to create an evergreen work of art
The instructions for the ball topiary can be seamlessly transferred to geometric and imaginative design variants of all kinds. Stable, reusable wire templates are helpful for an accurate result. For artistically sophisticated figures, such as birds, squirrels, swans or fairy tale characters, specialist retailers have sturdy wire stencils available. These are placed over the boxwood so that you can simply cut off the protruding shoots. Gardeners with craftsmanship can simply make the appropriate basic framework out of wire themselves.
Rejuvenate boxwood in stages - this is how you do it right
Putting a bare, senile box tree on the stick without further ado doesn't make sense. The evergreen deciduous tree has difficulty sprouting again from old wood. However, if you approach rejuvenation gradually, there are good chances of success. This is how it works:
- Best time is in late winter until March 1st
- In the first step, thin out dead branches
- Each winter, cut back no more than a quarter of the senescent shoots by half to two thirds
- With each cut, leave a short cone with unbranched side shoots or leaves
Long, overhanging branches with broom-like branches at the tip are slimmed down. Look for a one- to two-year-old side shoot on the over-aged shoot. Where a thick, old branch and young shoot fork, place the scissors. From now on, the young shoot takes over the leading position, so that there is no gap in the boxwood.
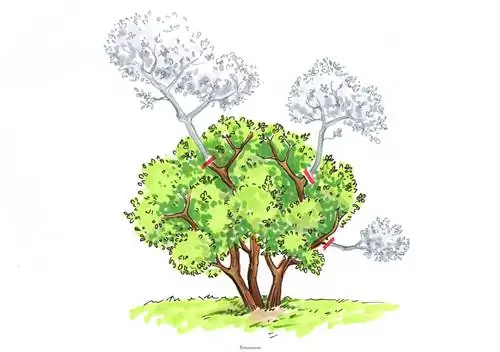
Rejuvenation of the boxwood can only be achieved in several steps. Each year divert a maximum of a quarter of the bare shoots to a young side shoot or small cone with leaves.
Background
Cone cutting promotes fresh growth
It is thanks to a sophisticated pruning technique that a rejuvenated boxwood allows fresh shoots to sprout from old wood. The tenon cut ensures that there is sufficient reserve material available at an interface on the old wood for renewed growth. To do this, position the scissors so that a 3 to 5 centimeter long cone with leaves or a side shoot remains. If you cannot find any leaves or at least one shoot at the intended interface, cut for cones with a sleeping eye. Thanks to the remaining plant parts on the cone, the nutrient supply to the old wood does not come to a standstill, which optimizes the prospects of new growth.
Frequently asked questions
Is boxwood poisonous?
All parts of the boxwood plant contain toxins. Intentional and unintentional consumption of leaves, flowers or fruits can cause significant symptoms of poisoning, such as nausea, stomach cramps and vomiting. Direct skin contact with the toxic plant sap causes painful allergic reactions. Bux trees should always be located out of the reach of children and animals. Please protect yourself from the poisonous plant sap by wearing gloves when cutting and caring for plants.
Boxwood borer on my border hedge - what can I do?
In the early stages of the infestation, immediate control with a high-pressure cleaner and foil has proven to be effective. Beforehand, spread the film completely under the affected hedge. Then spray the infected box hedge vigorously and deep into the interior. The voracious caterpillars fall onto the film and can be disposed of with residual waste. Repeat the method until there are no more caterpillars to be found. In the advanced infestation stage, most boxwood hedges are doomed. Before you clear a historic border hedge, it is worth trying to combat it with Bacillus thuringiensis, a biocide that is recommended for use in organic gardens.
Which type of boxwood is best suited for topiary as a ball?
Premium variety for the perfect boxwood ball is 'Blauer Heinz' (Buxus sempervirens). The slow-growing boxwood grows to a height of 40 to 50 centimeters and is naturally spherical and compact. Its shimmering bluish foliage gives the ornamental tree a special touch. Also recommended for topiary is the 'Herrenhausen' variety, which grows slightly higher at 60 centimeters. In comparison, the pure species reaches an impressive 200 to 450 centimeters in height and extends just as wide.
I would like to transplant a 5 year old and 1 meter high boxwood ball in winter. Is pruning necessary? What should you pay attention to?
When transplanting boxwood balls, you should primarily make sure that you cut off the root ball in a radius that corresponds to the ball diameter. Prepare a spacious, new planting hole for the plant with plenty of fresh potting soil. Water regularly after transplanting because drought stress is the biggest risk factor. Please do not prune to compensate for the lost root volume until March/April. If you cut too early, the cuts dry out and frost gets deep into the shoots. Avoid cutting into the old wood because the boxwood will then only sprout again slowly.
Leaves on boxwood turn orange and brown. The shoots have black stripes. What to do?
Here you describe the classic symptoms of a widespread fungal disease on Buxus, also known as boxwood shoot dieback (Cylindrocladium). Popular Buxus varieties are often affected, such as 'Blauer Heinz' and 'Suffruticosa'. But other varieties are not spared either. Cut out all affected shoots immediately and dispose of the cuttings in household waste or the organic waste bin. Then remove all leaves lying on the ground as well as the top layer of substrate in the bed and pot.
The 3 most common cutting mistakes
If pruning the boxwood does not lead to the desired success, the following 3 common pruning errors are usually responsible for the dilemma:
| Cutting errors | malicious image | Prevention |
|---|---|---|
| no plant cuttings on bare-root young boxwood | sparsely branched, prematurely balding shrub base | cut back all shoots by half in the year of planting and a year later |
| too deep, cut into the old wood | brown discolored areas for a long time | always cut this year's growth |
| Box hedge placed on the stick | no new growth, total failure | rejuvenate aged hedge in stages |

Tip
Planting boxwood involves numerous risks. Boxwood borers, fungal diseases and other pathogenic pathogens lurk on the evergreen deciduous trees. Therefore, consider a resistant alternative. Mountain Ilex (Ilex crenata) looks very similar to boxwood, but has a more robust constitution and more stable winter hardiness.

