- Author admin [email protected].
- Public 2023-12-16 16:46.
- Last modified 2025-06-01 06:02.
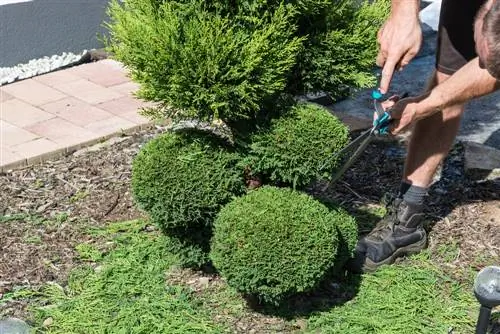
The boxwood has been cut into creative shapes and used for creative and artistic garden design for many centuries. The spherical shape is one of the most popular variants, as it is comparatively easy to implement.

How do I cut a boxwood into a ball shape?
To cut a boxwood into a ball shape, choose a bushy growing variety and first cut the “equator” and “longitudes”. Make sure the curve is even and use templates if necessary. Prune at least twice per season for optimal results.
Preparation
However, don't make the mistake of rushing into the garden with secateurs in hand and trimming the box you have there. In order for the project to be successful, some preparation is required. Otherwise, the plant could suffer damage that is difficult to repair or the result may be anything but attractive.
Selecting the variety
Not every boxwood variety is suitable for a spherical cut, which is particularly true for the varieties bred for hedge planting. Instead, choose a bushy plant that naturally has a more rounded shape - this is easier to cut into the desired ball. Furthermore, the selection of the variety depends on how big the ball should be: slow-growing varieties such as 'Green Gem', 'Suffruticosa' or 'Blauer Heinz' are very suitable for small balls, whereas comparatively strong-growing varieties such as 'Blauer Heinz' are more suitable for large balls. Rotundifolia' or 'Handsworthiensis'.
Time of cut
To maintain the spherical shape, you should cut the boxwood at least twice per season. The first cut, the so-called topiary cut, takes place between mid-May and mid-June. The second cut, which is also known as the maintenance cut, should be carried out by mid-August. Of course, you can cut the Buchs more often if necessary, but you should leave an interval of at least four weeks between each appointment. Frequently cut boxwood grows particularly densely.
Cutting boxwood round - this is how it works
Under no circumstances cut deep into the wood right from the start, as this will create unsightly holes that will be difficult to close again. Instead, proceed in small steps, first mentally dividing the book into latitudes and longitudes like a globe. First, cut the “equator” to the desired length, followed by the four to six “longitudes”. Now all you have to do is trim the gaps to the same length, making sure you have the desired even rounding. This is easier if you cut from the bottom up - so the top area is the last area that comes into contact with the scissors.
Cutting with template
Since freehand cutting is not easy for inexperienced people, you can also use a stencil. Wire baskets are available commercially (€16.00 on Amazon) into which the book is practically squeezed. Then you just have to cut along the wires, but don't cut too much: then the metal will be visible. Furthermore, you can simply make your own templates out of cardboard or another suitable material, which you place on the book and then trace the contours with scissors.
Tip
Place a tarpaulin or something similar under the box before cutting so that you don't have to laboriously rake up the numerous fine cuttings afterwards.


