- Author admin leonars@hobbygardeners.com.
- Public 2023-12-16 16:46.
- Last modified 2025-06-01 06:02.
Tillandsias (bot. Tillandsia) - sometimes also referred to as bromeliads - are so-called air plants that can be cultivated without a pot or substrate. However, contrary to popular belief, the fascinating, often bizarrely growing and magnificently flowering plants from the large family of bromeliads (Bromeliaceae) do not live on air and love: in order for their culture to be successful, the location and care conditions must be precisely tailored to their conditions.
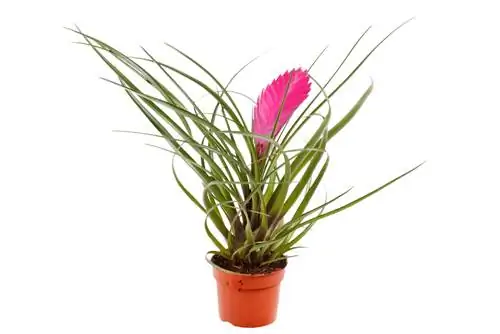
How to care for and propagate Tillandsia?
Tillandsias are epiphytic bromeliads that grow without soil and come in various shapes and colors. Their care requires bright locations, regular spraying with low-lime water and occasional fertilization. Propagation usually occurs via Kindel cuttings or seeds.
Origin and distribution
Tillandsia (Tillandsia) are an extremely species-rich genus with around 500 different members in the Bromeliad family (Bromeliaceae), which in turn belong to the pineapple family. The mostly epiphytic plants are native to the entire South American continent. They have adapted to a wide variety of habitats in the tropics and subtropics and can be found in the rainforest as well as in the high steppes (even at altitudes over 4,000 meters!) or even in the driest region on earth, the Atacama Desert on the Chilean sea coast find.
Usage
With growing popularity, tillandsias are being used as ornamental plants for the home or in terrariums. Here they are kept either alone, with other plants and/or together with animals. The advantage of a terrarium is that the living conditions here can be artificially perfectly adapted to the needs of the inhabitants. Light, humidity, etc. are otherwise difficult to regulate within an apartment. Especially in winter, it is simply too dry for many Tillandsia species, as the warm air from the heating dries out the environment. Regular - and of course necessary! - Ventilation in turn brings cold, which has killed many a Tillandsia within a short time.
If you want to cultivate unusual plants in your home, you should definitely use cultivated plants and check their origin carefully: Due to increasing demand in recent years, countless specimens have been taken from the wild despite legal bans in the countries of origin, so that Many stocks are now endangered or have even disappeared.
Growth and size
Most tillandsia species grow epiphytically, i.e. growing on trees and other plants (e.g. cacti) as well as inanimate surfaces such as rocks. They only form adhesive roots, but no fine roots. For this reason, the absorption of water and nutrients occurs exclusively through precipitation and from the air, at least in the case of the so-called gray or white tillandsias. These species have silvery suction scales on their leaves that they use to filter moisture and food from the air. Other species, however, reshape their leaves so that they form collecting funnels and catch incoming water. A few tillandsias - the so-called green tillandsias - are rooted in the soil.
There are also big differences between the species in terms of size and growth habits. The offering ranges from tiny, lichen-like tillandsias to large specimens with impressive rosettes of leaves.
Bloom, colors and flowering time
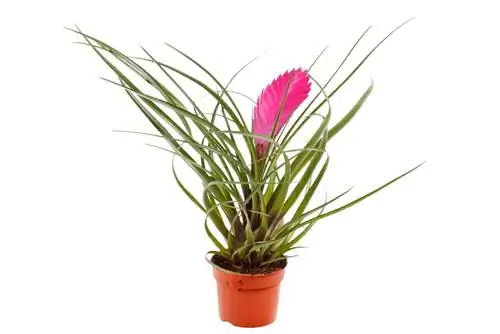
Depending on the species, tillandsias bloom between February and October, although it can take several years for the first flowering. The plants only bloom when they have reached a certain age and size. By the way, the eye-catching, long-lasting colors are only in the bracts. The actual, rather inconspicuous flower forms directly on these. The shapes and colors of the bracts vary greatly; intense, bright colors such as red, violet, pink and even magenta or orange predominate. The shape, on the other hand, is in many cases reminiscent of a torch or flame, with the colored bracts protruding far beyond the actual leaves.
By the way, Tillandsias like Sempervivum (houseleeks) only bloom once in their life, after which the plant dies. Before that, however, they form children through which the various species reproduce and, over time, develop real cushions. However, this does not apply to all Tillandsias: Some hardly produce any offshoots and instead reproduce almost exclusively through seeds.
leaves
The narrow leaves of Tillandsia form a rosette in many species; they are rarely branched and/or arranged spirally. The majority of them are herbaceous plants with mostly compressed shoot axes. The few species without a compressed shoot axis, however, develop longer stems with alternately arranged leaves.
Fruits
When fertilization occurs, tillandsias form capsule fruits that, like dandelions, are provided with “parchutes” for further distribution. However, the plants in living room or terrarium culture only rarely produce seeds because there are no pollinating insects.
Poisonous
Tillandsias are considered non-toxic, which applies to both humans and animals. For this reason, they are often used in terrariums for bearded dragons and other exotic pets. However, caution is still advised with some species because the leaves can be pointed and sharp, so injuries cannot be ruled out if handled carelessly.
The plants are not edible.
Location
Basically, Tillandsias need a location that is as bright as possible, but in many cases not in full sun. Plants are often best placed right next to a window. However, the optimal space depends largely on the needs of the individual species.
Gray tillandsias are as bright and sunny as possible. Since they are used to cooler nighttime temperatures in their natural environment, some species can also spend the summer months outdoors. A partially shaded and airy place is ideal for this, for example in the canopy of the house tree, on a trellis or on a wall. Green tillandsias, on the other hand, prefer bright, warm and very humid locations, although they do not have to be directly next to a window. But be careful: with these species the temperature should never fall below 15 °C, whereas gray tillandsias are kept at 10 to a maximum of 15 °C in winter.
Substrate and presentation
Epiphytic tillandsias are not cultivated in a substrate. Instead, attach them to an object that the plants will root to over time. These can be pieces of wood or bark, (low-lime!) natural or artificial stones, shells or just a simple wire.
Since the plants need some time to root, they are first glued or tied. For this you can, for example, use commercially available silicone glue from the hardware store or simple superglue. Make sure that the adhesives used are free of acetone. In this case, you should only leave the hot glue gun in the cupboard, as the resulting heat will damage the plant. Instead of gluing, tillandsias can also be tied together with thin strips of normal, elastic nylon tights. Use skin-colored stockings for this as they are almost invisible. Once the plant or plant arrangement is firmly rooted, the tights can be removed.
Tillandsias with soil roots, on the other hand, are best planted in orchid soil or in a self-made mixture of bark, peat moss and coarse sand.
Pouring
Since epiphytic tillandsias mainly absorb water through their leaves, you do not need to water these specimens - which are already cultivated without a substrate. Instead, spray the plants several times a week with low-lime, i.e. H. soft water. If possible, use rainwater or very well stale or boiled and cooled tap water. Mineral water with little carbon dioxide and a low lime content is also suitable. Alternatively, the plants can be immersed in a bath of lime-free water once a week during the summer months, but you have to be careful: if the leaves of the gray tillandsia come into contact with water, they turn green.
Since green tillandsias need high humidity, you should mist these species daily. If, on the other hand, it is an earth culture - no matter what type - the substrate must under no circumstances dry out. Water the plant with room temperature, low-lime water as soon as the soil is noticeably dry.
Caution is advised with desert tillandsias such as Tillandsia capitata. These usually don't need that much water, but are content with around one or two doses per month. However, no general statements can be made here because plants, like all living things, are very individual. If you observe your plants carefully, you will be able to estimate the actual water requirements more easily.
Fertilize
The epiphytic species also absorb nutrients through the leaves. Use a special bromeliad fertilizer that you add to the spray or irrigation water and simply spray onto the plant. The entire plant should always be misted so that all parts of the plant are supplied evenly. Since Tillandsias have only a low nutrient requirement, fertilization about every two weeks is sufficient between April and September and only every four to six weeks between October and March.
Cutting
Tillandsias must (and should not!) be cut. Dead or flowered plant parts can be easily picked off after a while.
Propagate
Propagation is simply done via offshoots that the plant itself forms and which are called “Kindel”. If possible, you should not cut these off from the mother plant, but rather separate them by carefully plucking or breaking them. Then plant or attach them to a new surface or place them in a sandy substrate. After the children are formed, the mother plant usually dies.
Only the species Tillandsia usneoides does not form children. To propagate these, cut off he althy shoots about ten to 15 centimeters long with a sharp and clean knife. Then tie them to cork or wood and spray them with water every day.
Propagation by seeds, on the other hand, is much more difficult, especially since at least two specimens of the same species must bloom at the same time for successful fertilization. Since tillandsias rarely bloom, you would probably have to wait many years to collect seeds yourself. Especially since the subsequent fruit ripening and germination each take several months.
Wintering
If you keep the tillandsias indoors all year round, you basically don't have to take any special care measures during the winter months. Only the water requirement can increase because the heating air greatly reduces the humidity. Furthermore, the fertilization intervals are extended to four to six weeks.
Tillandsias that have been summered on the balcony are put away in September at the latest - or earlier if the weather is cool - and overwintered in a bright and well-ventilated place. However, temperatures should not fall below 15°C. In this case there is no need for fertilization, only regular spraying makes sense.
Diseases
Although many Tillandsia species need high humidity, you should not overdo it: wetness inevitably leads to rot and then the plant can no longer be saved.
Pests
Infestation with aphids rarely occurs, although the animals can be easily removed by washing the leaves.
Tillandsias are not blooming, what should I do?
If your tillandsia isn't blooming, it's probably simply not ready to bloom yet. It can sometimes take many years for these interesting plants to develop their often bizarre flowers. In forums it is sometimes advised to stimulate plants to bloom with the help of an apple. Ripe apples give off ethylene, a gas that promotes ripeness. However, this method only works if the Tillandsia in question is ready for it.
Tip
Tillandsias held in glass balls look particularly pretty. This form of culture also offers the unbeatable advantage of creating optimal growth conditions.
Species
The following Tillandsia species are particularly popular in cultivation:
- Tillandsia cyanea: “Blue Tillandsia”, rosette shape for soil cultivation with leaves up to 45 centimeters long, blue-violet flowers and pink bracts
- Tillandsia lindenii: similar to Tillandsia cyanea, but with a flower stem up to 30 centimeters high and dark blue flowers
- Tillandsia usneoides: also known as “treebeard” or “Spanish moss”, produces long thread-like, gray shoots with scaled leaves
- Tillandsia aeranthos: silvery leaves and large, red to purple flowers
- Tillandsia fuchsii: long, red bracts on tubular flowers
- Tillandsia flabellata: up to 25 centimeters high, red tubular flowers between February and March
- Tillandsia albertiana: small, stem-forming, pretty flowers in bright red
- Tillandsia morreniana: also Catopsis morreniana, very small, delicate rainforest bromeliad, rare
- Tillandsia bulbosa: bulb-like stem with long, narrow leaves
- Tillandsia floribunda: very blooming and growing with purple flowers, ideal for beginners
- Tillandsia punctulata: distinctive rosette shape with pretty, white dotted flowers
In addition to the types listed here, there are numerous others available from specialist retailers, some of which are only recommended for specialists. Some bromeliad species require very special living conditions that can only be achieved with a lot of effort and detailed knowledge of these plants. If you stumble across the botanical name “Catopsis” when looking for suitable tillandsias, these are often species with special needs. Like Tillandsia, Catopsis are bromeliads, but have significantly smaller flowers and other differences (for example in the structure of the sepals). However, the species are closely related and the two names are sometimes used synonymously in plant shops.

