- Author admin leonars@hobbygardeners.com.
- Public 2023-12-29 04:51.
- Last modified 2025-06-01 06:02.
Phloxes don't stop at just one flower sequence. The romantic, opulent flower beauties are among theremontant perennials A targeted cut at the right time encourages flame flowers to bloom colorfully. If you grab the scissors beforehand, you will be rewarded with an extra long flowering period. Tidy gardeners prune your phlox one last time before winter. With gentle pruning, nature has a say in the choice of date. This tutorial highlights the entire range of advantageous cutting options. You can find out here when and how to cut phlox correctly.

How do I cut a phlox correctly?
To properly prune a phlox, you should remove wilted flowers to encourage rebloom, apply Chelsea pruning before the flowering period begins, and make rejuvenating divisions in fall or spring. Careful pruning promotes flowering and he althy growth of the plant.
Cutting types with timing
When phloxes transform the perennial bed into a summer sea of flowers, they vie for the favor of insects. The only goal of the colorful flower umbels is pollination as quickly as possible so that numerous seeds are produced for the floral offspring. In this regard, there is disagreement between phlox and gardeners, because the latter want a never-ending flowering period without annoying self-sowing. Different types of pruning direct the growth and flowering of phloxes in the desired direction. The following table summarizes all cutting options with information on the best time:
| Cut style | Goal/Occasion | best time |
|---|---|---|
| Cleaning up wilted inflorescences | promote autumnal blooms | shortly before the end of the first bloom |
| Chelsea cut | Prolongation of flowering period | Mid to late May, before the flowering period begins |
| Tidy pruning | Preparing for winter | Late autumn, beginning of winter |
| gentle pruning | Clear the bed for this year's sprouts | Mid-April to early May |
| Rejuvenation through division | revitalize old phlox | Late autumn or early spring |
| vase cut | Cut flowers for the vase | during the flowering period |
Cleaning out phlox - instructions for repair cutting
Phloxes belong to the illustrious perennial society, whose members are encouraged to bloom again. The floral masterpiece is known in technical jargon as “remounting”. In concrete terms, this means that the flowers rebuild themselves after being cut back and bloom again. Instead of investing energy in the growth of seeds, many Phlox species go through the motions and extend the flowering period. This is how you get the right repair cut:
- The best time is shortly before the end of the first flower bloom
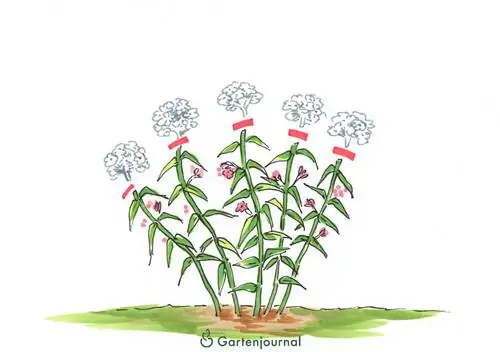
- As soon as the first individual flowers of an umbel wilt, they are cut
- Place the scissors over the next pair of he althy leaves
The figure below shows the best time and the right interface. It undoubtedly means a lot of effort to cut off some phlox umbels that are still blooming. Nevertheless, do not wait until all of the plate-shaped individual flowers have withered. At this point, the formation of seed heads has already begun and your Phlox lacks energy reserves for subsequent flowering.

As soon as the first flowers of an umbel wilt, cut off the inflorescence. Place the scissors over the next pair of he althy leaves.
How to make the Chelsea cut
In addition to regular cleaning, you can noticeably extend the flowering period with a tried and tested method of pruning. A skillful cutbefore flowering begins achieves a positive effect on the overall duration. The Chelsea cut - also known as the Chelsea chop - does more than just extend the flowering period. At the same time, a phlox is stimulated to produce richly branched, bushy growth with numerous flower buds. How to cut correctly:
- The best time is between the end of May and the beginning of June before the flowering period begins
- Cut back the outer stems of a phlox plant by a third
- Choose to shorten all stems or part of them
With the original Chelsea cut, the outer stems of all perennials are cut back. As a result of the pruning, each phlox develops new side shoots and grows bushier. The flowering time is postponed by four to six weeks because the buds form and open along the cut shoots with a delay.
Can't you bring yourself to take a radical approach? We then recommend trimming the stems in the front area of the perennial. The result is that wilted, bare stems within the center of the plant are concealed during the summer as the late bloomers bloom in the foreground.
Background
Bypass or anvil scissors?
All efforts to achieve the perfect Chelsea Chop or repair cut on Phlox are wasted if unsuitable cutting tools are used. If cutting leaves you with crushed and bruised stems, you will look in vain for the bright flower umbels. One-handed secateurs (€8.00 on Amazon) with a bypass mechanism are well suited for smooth cuts. The scissors work with two sharp blades that move past each other. In contrast, anvil scissors are equipped with a sharp blade and a blunt opposite side, the anvil. The mechanism reduces the effort required, but carries the risk of crushed shoots. When it comes to cutting the herbaceous flower stems of a phlox, bypass scissors are clearly the best choice.
Cutting phlox in autumn
Traditionally, gardeners cut dead perennials in the fall. The measure ensures order in the bed and acts as preparation for the next shoots in spring. To ensure that colorful spots of fresh flame flowers appear in the garden as early as possible, all worn-out parts of the plant must go. How to cut phlox correctly in autumn:
- The best time is before the onset of winter
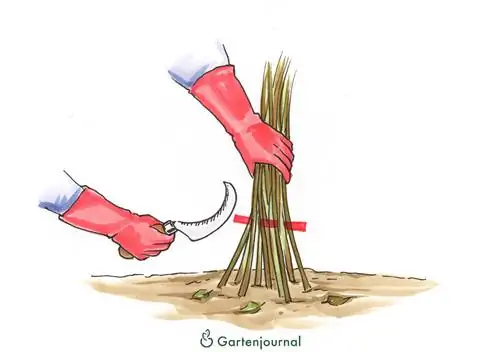
- Clutch dried flower stems in one hand
- Bend tuft to the side
- Take the knife or garden sickle in the other hand
- Phlox stemshand-width cut above the ground
Cuttings from he althy phloxes are ideal as mulch to feed soil life together with compost. After autumn pruning, leave the shoots and leaves lying on the bed soil. A variety of insects know how to use the remains as shelter during the cold season. As they decompose, dead phlox stems release valuable nutrients into the soil, where busy microorganisms make them available for the next generation of plants.

Grip dead stems with one hand and bend the tuft slightly to the side. With the other hand, cut the shoots hand-width above the ground.
Excursus
Garden sickle for skilful perennial pruning
The curved cutting edge glides effortlessly through dead perennial stems. The sickle cuts even small branches in no time. The garden sickle works more effectively than conventional garden shears and more precisely than any hedge trimmer. At first glance, the cutting tool is reminiscent of a scythe that is too small. In fact, it is an import from Japan, where the perennial sickle is traditionally used for cutting bamboo, thin branches, grasses and perennials. The blade is razor sharp and has a self-sharpening groove edge. Nevertheless, the risk of injury for the gardener is low because cutting is only done when pulled. The blade of a perennial sickle does not cut when pressure is applied.
Spring pruning - gentle on nature
In spring there is a big difference between populated areas and the outdoors. While in meticulously maintained gardens at the end of winter green tones dominate with the first touches of color from early flowering plants, in Mother Nature's kingdom beige and brown tones predominate. There are dead stems in meadows and areas of wild shrubs where the hibernating insects are preparing for spring. The previous year's seed heads are a valuable source of food for domestic and returning songbirds.
In the wild, the colors of spring arrive much later. Dry perennial stems still have important tasks to fulfill. Only when spring storms and an awakening animal world have snapped most of the stems in April does the young green gradually emerge.
Nature-oriented gardeners give a lot of space to natural growth and decay. Pruning the perennials is only on the schedule from April - completely in harmony with nature. This has the beneficial side effect for your phlox that dead shoots and leaves reliably protect the rootstock in the ground from moisture and frost during the winter. The first centimeters of young shoots benefit from this protection when March and April surprise with delayed ground frosts.
The only difference between gentle spring pruning and bold autumn pruning is a careful approach. Cut off dead plant parts above green young shoots if they have already emerged from the soil. At this stage, cutting is usually no longer necessary. The dissolving process of the previous year's shoots has progressed to such an extent that the stems will detach themselves when you pull them with your fingers.
Rejuvenate old phlox by dividing it
Over the years, a phlox loses its vitality and ability to bloom. Don't just accept the stagnant abundance of flowers on your phlox. By extending the pruning to a division of the root ball, you can give fresh impetus to growth. The method is primarily suitable for the phlox (Phlox paniculata) and varieties derived from it. A perennial can best cope with the procedure when it is dormant. How to rejuvenate an old phlox by division:
- Time slot is open in autumn (November) and spring (March/April)
- Cut back dead shoots to a hand's width above the bed soil
- Detach the root ball in a circle with a spade
- Push the spade under the rootstock and loosen it using up and down movements
- Lift the bale out of the ground and place it on a solid surface
The division is achieved excellently with a straight spade blade. Divide the root ball in half. You can divide a very large rootstock into four segments, as long as each section has at least 6 to 8 shoots. Plant each phlox piece in a sunny location with fresh, moist and nutrient-rich soil so that the previous planting depth is maintained. Enrich the soil in the planting hole with compost and horn shavings to promote rooting. Water regularly and abundantly afterwards. A positive side effect of the rejuvenation treatment is reproduction at no cost.
Cutting phlox for the vase
A phlox won't mind if you cut off a few flower stalks for a colorful bouquet. Properly cut and inserted, the fragrant flower heads stay fresh in a vase for up to 12 days. The best time to prune the vase is in the morning when the morning dew has evaporated. Choose umbels whose first flowers have already opened. Cut a flower stem diagonally at the bottom. Remove the leaves where a stem will later be in water. Phlox shows its most beautiful side as a vase decoration in water at room temperature, which is changed daily.
Frequently asked questions
Mildew is spreading on my phlox - what to do?
Mildew is one of the most common plant diseases that affect phlox. The fungal infection is transmitted by the wind, rain and irrigation water drops and unclean scissors. The unmistakable symptom is a mealy-gray fungal growth that spreads on the leaves and shoots. Cut off affected plant parts immediately and dispose of the remains in household waste. To prevent further spread, treat diseased phlox and neighboring plants with environmentally friendly wetting sulfur or the tried and tested home remedy of one liter of water and one eighth of a liter of fresh milk.
Is the phlox pruned immediately after flowering in September?
Large-flowered phlox usually gives you a second bloom if you cut the perennial back after the main bloom. The best time is when the first petals on the umbel wither. If you cut above the next he althy pair of leaves, deeper buds are activated and bloom within a short time.
I cut back my tall phlox after the flowering period. Should I fertilize the perennial again in August? If so, is compost suitable or is blue grain better?
If the phlox is fertilized with a concentrated load of nitrogen in autumn, the perennial will be in a losing position in winter. Fertilizers, such as blue corn, trigger vigorous growth that makes phlox vulnerable to the first frost. Give your phlox time to mature from August through winter. The flowers in the garden are only fertilized with compost and horn shavings at intervals of 2 weeks from the moment they sprout until the end of July. Alternatively, apply a slow-release fertilizer, such as blue grain, once in May.
Should I cut back the carpet phlox after flowering?
Small Phlox species and varieties do not require pruning. Just let the carpet phlox (Phlox douglasii) continue to grow. In winter, the above-ground parts of the plant die off, making way for renewed flowering next year.
My phlox suffered from powdery mildew all summer long, which I repeatedly fought with fungicides. Now the flowering period is over and mildew is spreading again. Should I use fungal medication again or cut off the plant?
As autumn is just around the corner, the perennial is slowly retreating. It is therefore advisable to cut back the affected parts of the plant to a hand's width above the ground. It is important to note that you do not throw the clippings into the compost. Please dispose of the shoots in the household waste bin or burn them in the fire basket. At this point in time you will no longer achieve any control success with fungicides.
The 3 most common cutting mistakes
If the flowering period comes to an early end, efforts to rebloom come to nothing or Phlox disappoints with measly flowers, there is a classic omission behind it. To protect you from such annoyances, the following table lists the three most common cutting errors with tips for successful prevention:
| Cutting errors | malicious image | Prevention |
|---|---|---|
| no repair cut | Lack of magnificent rebloom | cut off wilted flowers |
| cleaned up too late | no rebloom | Make repair cuts when the first individual flowers of an umbel wilt |
| Phlox never recorded and shared | steadily decreasing flowering | rejuvenate every few years by division |
Tip
Plumflowers are a must in an insect-friendly garden. The bright flowers of Phlox are a popular destination for butterflies. Swallowtails, aurora butterflies and the like don't care that the perennials are native to distant North America. The main thing is that the opulent perennials thrive with unfilled flowers so that bees, bumblebees and butterflies feast on their rich buffet of nectar and pollen.


