- Author admin [email protected].
- Public 2023-12-16 16:46.
- Last modified 2025-01-23 11:20.
Orchids are only repotted every three to four years. The first repotting should be done immediately after purchase to remove any trellis and check the plant for diseases. When repotting, the orchid loses a lot of root mass. Thanks to the space gained, the old pot, but not the substrate, can be reused several times.
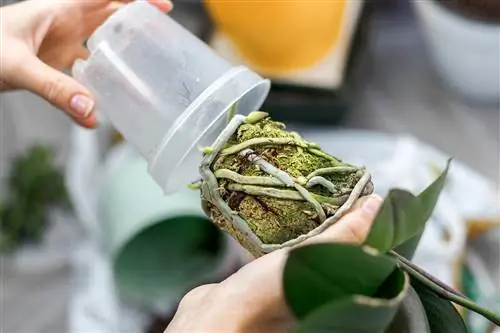
How to repot orchids?
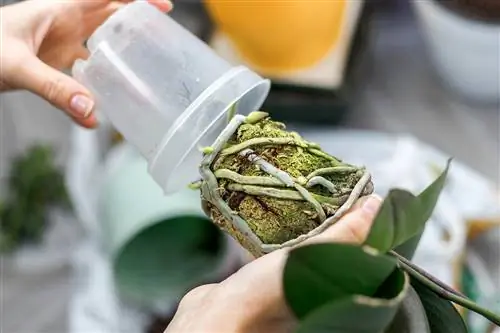
The orchid is removed from the pot along with the substrate. The old substrate is thrown away. The plant is examined for dead and diseased shoots and these are cut off. The bottom of the pot is filled with new substrate and the orchid is placed on top. The pot is filled with substrate and placed in a water bath. The water is then poured off.
Do orchids need to be repotted?
Repotting orchids is an important part of care and thereforeessential This essentially replaces the old orchid substrate. The orchids are usually repotted in coarse material. However, this dissolves over time. The finer structure of the earth then ensures poorer water drainage. In the worst case, this can lead to waterlogging and root rot.
Timing and features of repotting orchids
The ideal time for transplanting is outside the orchid's stressful times. Ideally, transplanting should be done inspring before floweringor inautumn after flowering. A large part of the plant's energy is used up, especially when forming and maintaining flowers. Repotting during the flowering period is therefore not recommended. Due to the rather slow growth, repottingevery three to four years is usually completely sufficient. However, if several of the points mentioned in the next section apply, repotting can also be done earlier.
Due to the rather slow growth, repottingevery three to four years is usually completely sufficient. However, if several of the points mentioned in the next section apply, repotting can also be done earlier.
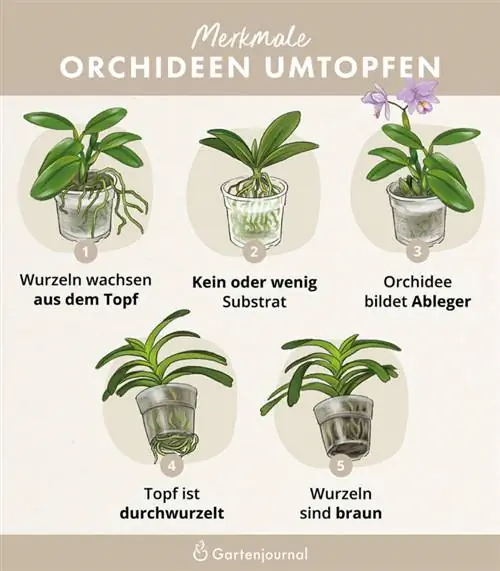
TheseCharacteristics will show you when an orchid should also be repotted:
- floppy leaf structure
- permanently high moisture content in the pot
- fine crumbly consistency of the substrate due to natural decomposition
- hardly any soil left in the pot
- visible deposits of pathogens in the soil (e.g. white mold)
- brownish color of the roots
- complete root penetration of the current planter
- Roots growing through the drainage holes
- Roots growing beyond the edge of the pot
If at least one of the above signs applies to your orchid plant, repotting is strongly recommended. In the best case scenario, this ensures the survival of your plant and supports it in recovery.
Roots and aerial roots
The tropical plants we know are often characterized by underground and above-ground roots. However, the latter only arise due to a lack of space in the pot. In order to continue to supply the plant with sufficient moisture and nutrients, the roots are constantly looking for new ways. If the space requirement is too small, these move upwards.
Cut off aerial roots
Aerial roots are completely normal root strands. However, due to space constraints, they grew out of the pot and not into it. Cutting off is generally only necessary if root parts are alreadydeadordamaged. In addition, very long and bulky, but still he althy individual shoots can also be shortened. However, this should only be done to a small extent so as not to put additional strain on the orchid. The roots in particular are of great importance for growing in the new pot.
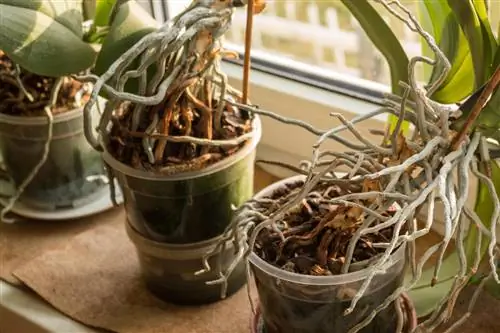
The appearance of aerial roots is a signal that the planter is too small. Therefore, repot your orchid quickly to ensure the water and nutrient supply.
Basically, great caution is required when pruning orchids. In the worst case, an incorrect cut can lead to the death of the entire plant. For further information, we have compiled the most important basic rules here.
What to do if the orchid won't come out of the pot?
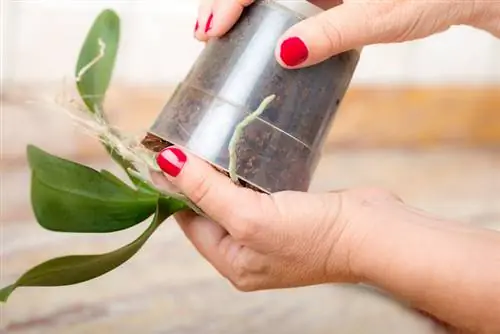
If orchids are not repotted for several years, the pot will be riddled with many strands of roots. This sometimes makes it difficult to get the plant out. However, never use force. Pulling too hard can damage the root strands. It is therefore advisable to only knead the pot with light pressure. Shoots that are particularly matted on the underside can easily be untied in parallel.
You should avoid cutting the pot. On the one hand, this is not advisable for sustainability reasons. Reuse is impossible due to the cut. On the other hand, using scissors can damage the roots. Therefore, contact with the roots with sharp tools should be avoided.
Rigid aerial roots: What to do?
Over time, the individual root shoots become increasingly thicker. This is especially difficult when repotting. However, with the help of alukewarm water bath even the most stubborn aerial roots can be softened. It is important to initially leave the plant in the pot and only remove it slowly to avoid damage.
If small injuries are still visible, they must be allowed to heal before watering again. Therefore, wait a few days until the wound site has dried. Additionally, a thin layer of cinnamon or charcoal powder can be applied if necessary. These offer natural protection against pathogens and pests and thus promote wound healing.
Identify diseased and dead roots
Even with the best care, dead root strands can be found on every orchid plant over time. It is particularly recommended when repotting to check the root ball for dead shoots. Diseased or dead shoots are characterized by the following characteristics:
- thin
- dried/wrinkled
- mushy
- yellow-tan coloring
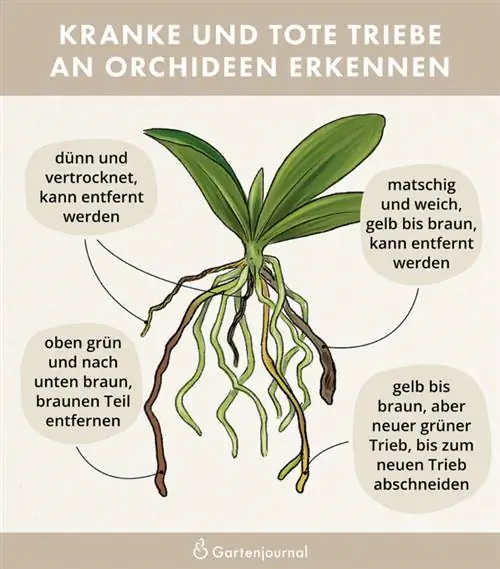
Care should be taken with shoots that appear to be dead but have developed a new side strand. In this case, cutting back the entire root would also result in the loss of the new section. These sections must therefore be left out when pruning. Particularly muddy spots often indicate diseased areas. To prevent the transfer of wound secretions, it is recommended to cover the interface with charcoal powder. On the one hand, this stops the wound flow and, on the other hand, disinfects in a natural way.
Repotting orchids
Repotting the orchid can be done in just a few steps. Before you start the actual work, you should make sure that the substrate is as dry as possible. This makes it easier to remove the plant, as moist soil sticks much more strongly to the roots.
Instructions
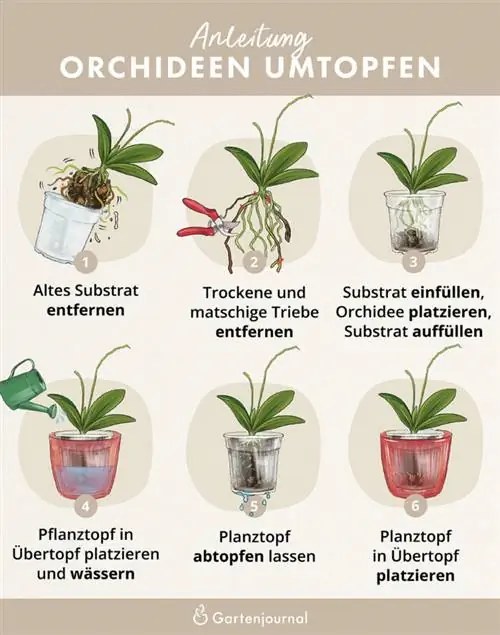
- Take the orchid and its roots out of the pot (if necessary, knead the container slightly to loosen everything)
- Cut out root areas that are no longer intact (dead or diseased)
- If necessary, dust interfaces with cinnamon or charcoal powder
- clean and disinfect new or old planter thoroughly
- Fill substrate mixture about 1/3 full
- Place an orchid plant in the middle
- Fill the surrounding area with the same substrate mixture and insert support
- Place the pot with the orchid in a planter and pour it with low-lime, room temperature water (leave it in the water for a maximum of 30 minutes)
- Take the pot out of the water and let it drain well
- Place the orchid in a planter (no water should remain at the bottom)
Pay particular attention to the correct positioning of the plant. If this is inserted too deep, there is a risk of stem rot as the heart comes into contact with too much moisture. A few centimeters of the roots growing out of the heart of the leaf should therefore remain outside the substrate.
Repotting is also a very good opportunity to divide your orchid. You can find out here which types of orchids are suitable for this form of propagation and what exactly you should pay attention to.
Tip
If large-scale pruning of the roots is necessary during relocation, watering and the water bath should be avoided for a few days. This enables the orchid to heal wounds independently.
Substrate for orchids
Selecting the right substrate for your orchid is the basis for he althy root growth. Particular attention should be paid to the natural occurrence in order to enable natural planting. In tropical forests, orchids are primarily found on tree bark. Unlike many native flowers, it does not require fine, crumbly soil. The filling material used is mainly coarser granules that do not constrict the plant.
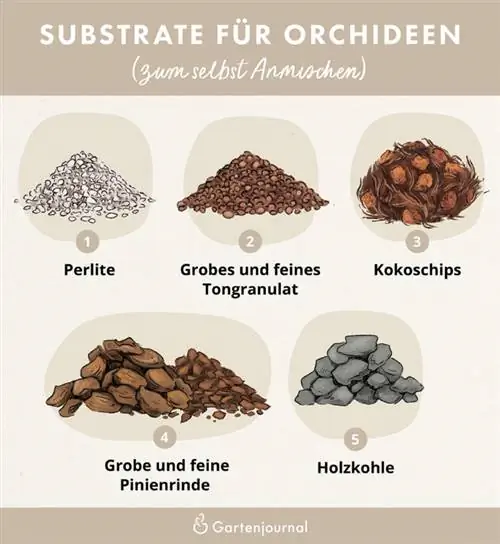
Pine bark: Pine bark loosens the substrate mixture optimally thanks to its coarse structure. Even after a long time, it does not fall apart like conventional bark, but rather retains its shape. This ensures permanently good ventilation and an ideal water flow in all layers.
Coconut chips: Coconut chips have a similar coarse structure to pine bark, but are significantly more fibrous. This allows the roots to have a better grip, which, combined with the ability to store water and nutrients, leads to an optimal symbiosis. Above all, the minerals potassium and nitrogen contained in it are made available directly to the root shoots for as long as possible.
Perlite: Perlite is fine-crumbly volcanic rock that primarily serves as a water reservoir. By absorbing moisture, the other components themselves remain drier, so that waterlogging can be avoided. If necessary, the stored water can also be released back into the environment.
Clay granules: Clay granules, also known as expanded clay, are primarily known as stable drainage material. The permanently stable structure of the beads improves air circulation. In addition, the building material known from hydroponics can absorb moisture and gradually release it again. Nutrients cannot be absorbed by the clay and are not contained.
Charcoal: The main task of charcoal is to regulate the pH value. In addition, it serves as a natural filter for pathogens that are absorbed through the air and water.
However, not every type of orchid is suitable for every substrate mix. In principle, however, one can say that as the size of the plant and pot increases, the grain size can be chosen to be coarser. In principle, the commercially available orchid soil can be used without hesitation. But you can also make your own mixture in just a few steps.
Fine mixture for small pots, plants and cultivation:
- fine pine bark (grain size 0-10 millimeters): 50-60%
- fine clay granules: 20-30%
- Perlite: 20-30%
Medium Blend:
- Pine bark (grain size 8-15 millimeters): 50-60%
- Clay granules: 20-30%
- Perlite: 20-30%
Coarse mix for large pots and plants:
- Pine bark (grain size 15-25 millimeters): 40-50%
- Coconut chips: 30-40%
- Clay granules: 10-20%
Pots for orchids
The pot, like the substrate, is an important basis for the even growth of the orchid. As already mentioned, the consequences of choosing a pot that is too small are particularly noticeable in root growth. What you should pay attention to when choosing the vessel and the size is explained in the following sub-points.
Why a transparent pot?
Cultivation in a transparent plant pot offers one crucial advantage over opaque variants: the contents can be seen at a glance. Delicate flowers such as orchids in particular are much easier to care for. Errors that occur can be identified and corrected more quickly. Since most diseases first appear in the root ball, this should never be ignored when taking a correct anamnesis. If changes are already evident in the individual strands, sooner or later these will also spread to the above-ground areas.
The right pot size
Plant pots are available in different sizes. The most common variants have a diameter between six and 22 centimeters. This size is also sufficient for large orchids. There are usually two centimeters more between the individual sizes. When repotting, you should always chooseat least one size larger to create new space for growth. In the best case scenario, this completely avoids the formation of aerial roots, which are a clear sign of a lack of space. In this context, it may also make sense to skip a size.
Suitable pots
A variety of different pots for growing orchids are available in stores. Plastic pots are the most popular and best-known method. However, plastic is not the optimal material for orchids because it provides a breeding ground for diseases. “The vessels that are suitable as containers for the livelihood of orchids in our latitudes must be suitable for the environment, i.e. temperature stabilizing, water-retaining, adapted to the roots, water-giving, capable of photosynthesis, and aesthetically form a unity with the beauty of the orchids and our feelings. A plant that can sense water, move to it, and get it, also reacts to the difference between alien and natural material.“says the pottery Jung.
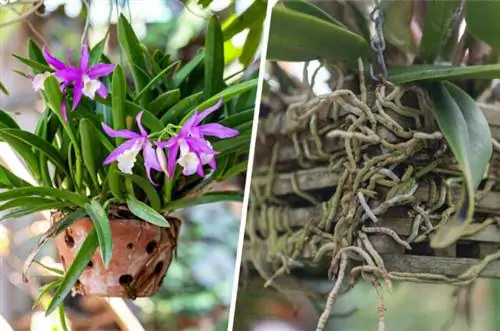
Perforated clay pots for orchids ensure good ventilation and lighting of the interior. The clay also stores excess moisture and is therefore effective against waterlogging. Vanda orchids, which do not require any substrate, are particularly popular in this form of culture. In addition to clay pots, wooden baskets are also suitable for planting.
Care after repotting
The orchid should be watered again after a week at the earliest. Regularly check the degree of dryness of the substrate to determine the right time. Depending on the size of the plant and the planter, this can take between one and three weeks. In the meantime, the above-ground parts of the plant can be lightly sprayed with water.
With the fresh substrate, new nutrients are supplied at the same time. To avoid over-fertilizing the orchid, you should not fertilize for the next four weeks. When repotting in spring, it is recommended to fertilize every two weeks after the four-week break until all stems have bloomed.
When repotting in autumn, you should stop fertilizing before winter. Since the plant reduces its mineral requirements due to the impending hibernation, there is a risk of a stress reaction to the high nutrient concentration.
You can find more tips on how to properly care for orchids in this article.
FAQ
How to repot orchids?
After the plant has been carefully removed from the old pot, it is examined for diseased and dead areas. Then the substrate is filled in and the seedling is inserted. Finally, the plant is watered thoroughly.
When should orchids be repotted?
Spring and autumn are best. However, the right time to repot orchids depends on several factors. Among other things, the selected variety and its individual growth rhythm play a decisive role.
How do I know when an orchid needs to be repotted?
A clear sign of repotting is the excessive formation of aerial roots. Due to lack of space in the pot, the root strands grow up and out of the pot. In addition, a completely rooted pot is a sign that the plant urgently needs to be repotted.
Which substrate is suitable for orchids?
Ideally, the substrate for orchids consists of several components. In addition to pine bark, coconut chips, perlite, clay granules and charcoal have proven useful.
What happens to the aerial roots when repotting?
The aerial roots should be added to the pot when repotting. Only sick or dead shoots should be cut off.
When should orchids be watered after repotting?
After repotting and an extensive water bath, the orchid should not be watered for a week. This makes it easier to grow into the new pot and allows wound healing in the open areas.

