- Author admin [email protected].
- Public 2023-12-16 16:46.
- Last modified 2025-06-01 06:02.
Crispy peanuts from our own harvest are a worthwhile project in the hobby garden. The tropical origin of cultivated peanuts is no longer an obstacle. As a legume, the peanut plant is surprisingly easy to plant and care for. Hobby gardeners big and small experience an exciting growth phenomenon first hand. Why wait any longer to grow? Here you will find out how to grow a peanut plant yourself in a pot and in a bed. Compact instructions for cultivation, planting and care.
How do you grow a peanut plant yourself?
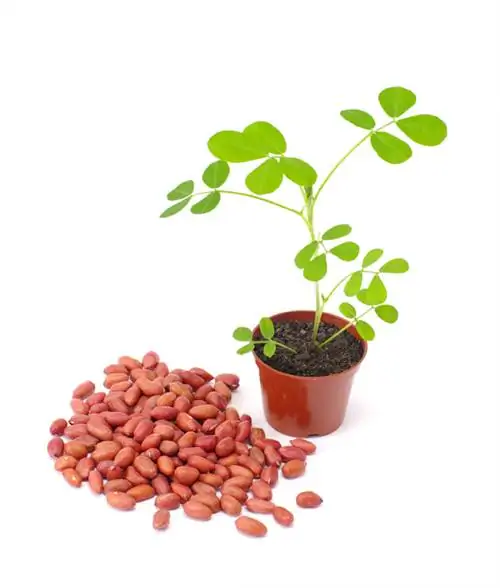
To grow a peanut plant yourself, grow the seeds on the windowsill in February in a mix of coconut soil and herb soil. Plant the young plants in mid-May in a sunny location with loose, sandy soil or in a large pot with organic soil.
Profile
- Scientific name: Arachis hypogaea
- Family: Legumes
- Origin: South America
- Growth: annual, herbaceous, bushy
- Flower shape: butterfly flowers
- Fruit: legume
- Root: taproot
- Location: sunny
- Soil: loose-sandy
- Harvest time: July to September
- Winter hardiness: not hardy
- Uses: roasted peanuts, peanut oil
Origin
The peanut genus (Arachis) includes 80 species, of which the cultivated peanut (Arachis hypogaea) has achieved worldwide fame. The legume species are all native to South America. Thanks to its tasty seeds and high value as an oil crop, the peanut plant is now grown in almost all tropical and subtropical regions. Crunchy, roasted peanuts and he althy peanut oil from the supermarket mostly come from Florida, as the following video demonstrates.
Video: From the peanut plant to the crunchy nut
Growth
The peanut plant is characterized by annual, herbaceous growth. The dense, bushy foliage, the numerous flowers and legumes are supplied by a taproot up to 50 cm deep. Stems and side shoots grow upright, semi-upright to creeping and are 30 to 80 centimeters long. Even before the flowering period begins, decorative, alternate leaves emerge. These consist of a petiole up to 10 centimeters long and distinctive leaflets arranged in pairs with a short stalk.
Bloom
From May to August, the peanut plant produces golden yellow butterfly flowers. A hermaphrodite peanut blossom is only open for a few hours. There is no time to wait for pollinators for days. For this reason, peanut flowers simply pollinate themselves. The result is an exuberant floral display of several hundred flowers that open one after the other over the course of the flowering period. The failure rate is high. As a rule, only 20 percent of fertilized flowers actually turn into peanuts.
Excursus
Geocarpy - This is how the peanut gets into the ground
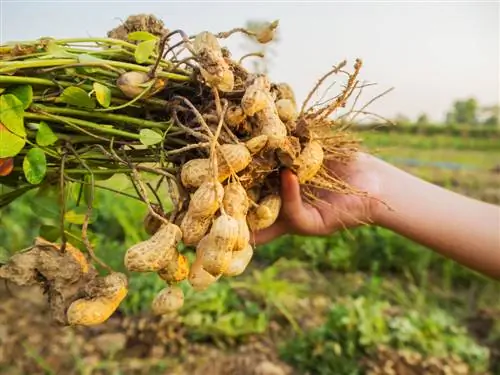
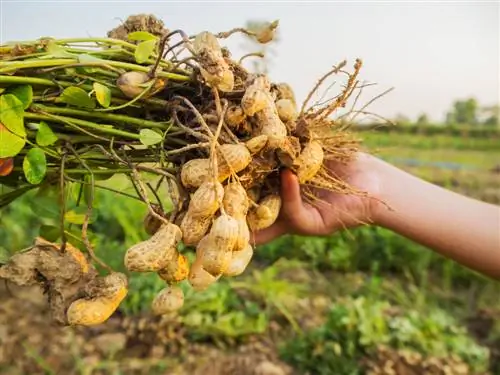
After flowering, a fruit stalk up to 30 centimeters long grows under the ovary and slopes downwards. This fruit carrier (carpophore) literally bores into the loose soil. Only when the soil is protected does the ovary develop into the sought-after peanut. This fascinating process is called geocarpy, or earth fertility in gardening terms.
Fruit
The name peanut plant refers to the growth of legumes in the soil. A fruit is two to six centimeters long and contains one to four, slightly constricted seeds. In contrast to other legumes, the pods of a peanut plant do not open on their own. Rather, the fruit wall gradually becomes woody and becomes a closed fruit, as we know it from real nuts. Ripe seeds are rich in he althy minerals and vitamins. A high energy value makes peanuts calorie bombs, as the following table shows:
| Peanuts energy value | Calories per 100 g | Kilojoules per 100 g |
|---|---|---|
| raw seeds | 564 kcal | 2341 kJ |
| dry roasted | 589 kcal | 2441 kJ |
| roasted and s alted | 602 kcal | 2491 kJ |
| Peanut Butter | 623 kcal | 2581 kJ |
| Peanut oil | 899 kcal | 3898 kJ |
Grow your own peanut plant - instructions
For productive growth, the peanut plant needs a frost-free growing season of 160 to 180 days between sowing and maturity. Direct sowing in the garden is doomed to failure in the Central European climate. Growing behind glass improves the chances of success. Hobby gardeners in mild regions plant young plants in the bed after the ice saints. Growing in a pot is more effective. The following instructions highlight all the important aspects. How to grow a peanut plant yourself:
Growing on the windowsill
The time window for growing on the windowsill opens in February. The following overview explains the general conditions for successful sowing of peanut plants:
- Seeds: untreated, unpeeled peanut kernels
- Preparation: Soak in lukewarm chamomile tea for 24 hours
- Substrate: Mix of coconut soil and herb soil (1:1)
- Seed container: 10 cm seed pot or seed tray
- Sowing: Press peanut seeds 1 cm deep into the soil, sieve thinly with sand, water with a fine spray
- Hood: put perforated plastic bag over it
- Germination: at 25° Celsius in a bright window seat within a week
- Important: Ventilate the hood daily, remove after germination
- Pricking out: repot after 5 to 6 weeks in pricking soil
Pricked peanut seedlings benefit from a hardening off period. From mid to late April on warm spring days, place the repotted young plants in a partially shaded, protected place in the garden, on the balcony or terrace. Your pupils will continue to spend the cool nights behind glass.
Planting
The planting time for peanut plants begins in mid-May. Choose a location in full sun, warm and sheltered from the wind with well-drained, sandy, loose garden soil. A planting distance of 25 x 25 centimeters has proven to be effective in practice.
So that the capricious weather conditions in Central Europe do not torpedo peanut cultivation, we recommend planting them in pots. Please use a large container that offers enough space for the deep, post-like roots. Choose organically pre-fertilized vegetable or herb soil as a substrate. Waterlogging is avoided with drainage made of lava granules. It is important to note when planting in beds and pots that there is no layer of mulch so that the fruit bearers can drill into the soil unhindered.
Care for peanut plants - tips & tricks
In cultivation, the peanut plant surprises with its good-natured frugality. The following tips and tricks explain how to properly care for peanuts in pots and beds:
- Watering: water sparingly, avoid waterlogging
- Fertilizing: administer organic liquid fertilizer every 4 weeks
- Hilling up: Hilling up peanut plant after geocarpy is complete (fruit bearers are in the ground)
- Cutting: Do not clean out peanut blossoms, do not cut shoots
Once the ovaries have arrived safely in the soil, mulch the bed or substrate thinly with leaves to protect the ripening peanuts from too much moisture.
Popular varieties
The cultivated peanut (Arachis hypogaea) has given rise to various varieties with specific properties that interested hobby gardeners can purchase from specialist retailers as fresh, unroasted seeds for sowing:
- Jimmy’s Pride: certified Arachis hypogaea seeds from Sperli-Samen.
- Runner: one of the most widely grown peanut varieties with extra large seeds.
- Virginias: Peanut variety with the largest kernels in the world, popular as canned roasted peanuts.
- Spanish: small, tasty kernels in a yellow-brown seed coat, ideal for producing peanut oil.
- Red Tennessee Valencia: small, sweet seeds, perfect as a snack or baking ingredient.
FAQ
Is the peanut a nut?
This question is controversial. From a botanical point of view, the peanut plant is a legume with edible seeds. According to the definition, the pod is of course an opening fruit, like you know from peas or beans. This does not apply to the pods of a peanut plant because they grow as woody cover crops and do not release the seeds. This fact makes the peanut a real nut from a morphological point of view, like the walnut.
Roast peanuts. How does it work?
The easiest way is to roast peanuts in the oven. Line a baking tray with baking paper and preheat the oven to 150°. Roast the seeds on the middle rack for about 60 minutes. Turn the kernels regularly to ensure even browning. Alternatively, you can roast peanuts yourself in a coated pan within 20 minutes.
I am allergic to nuts. Do I have to avoid peanuts as a legume?
Botanists define the peanut as a legume. For this reason, an allergy to nuts does not necessarily mean an allergy to peanuts. Caution is still advised, as an allergic reaction cannot fundamentally be ruled out. Many allergy sufferers suffer from multiple food allergies. Please seek advice from your family doctor.
Can you still eat peanuts with mold on them?
No. Please throw away moldy peanuts. The mold Aspergillus flavus does not remain on the seed surface, but penetrates the infected peanut and produces toxins there that cause severe symptoms of poisoning after consumption.
What he alth effects do peanuts have?
Nutrition scientists attest to peanuts numerous positive effects on he alth. Anyone who enjoys the fatty, high-calorie seeds in moderation can look forward to natural prevention against heart and circulatory diseases, a balanced cholesterol level, protection against premature skin aging, strong bones and a good mood. This is assuming you are not allergic to peanuts.
What nutrients are contained in peanuts?
Peanuts are full of valuable nutrients. Every 100 grams of raw peanuts (not roasted, uns alted) contain: 24 g protein, 8 g fiber, 658 mg potassium, 176 mg magnesium, 10 mg vitamin E. However, 50 g fat and 8 g carbohydrates make the peanuts a calorie bomb A whopping 564 kcal or 2341 kJ.
Are roasted peanuts suitable for sowing?
No, roasted peanuts have lost their ability to germinate. To grow a peanut plant, use raw, untreated and unpeeled peanut seeds. Only the woody seed coat is removed. Germinating seeds are available from specialist retailers, for example from Sperli-Samen, Saflax, Dehner, Deaflora or Amazon.
How are peanuts harvested?
Peanuts are ready to harvest when the leaves of a peanut plant turn yellow and wilt. Lift the plant out of the ground with a digging fork and shake off the soil. Hang the pods to dry in a warm, rain-protected place for 14 days before opening the woody seed shells.

