- Author admin [email protected].
- Public 2023-12-16 16:46.
- Last modified 2025-06-01 06:02.
Laid out as a spiral, your herb bed has the right twist to make a decorative statement in the garden. Even those with gross motor skills among home gardeners can make a herb snail themselves in no time. These DIY instructions explain how you can easily build your own herb spiral yourself.
How do I grow a herb snail in the garden?
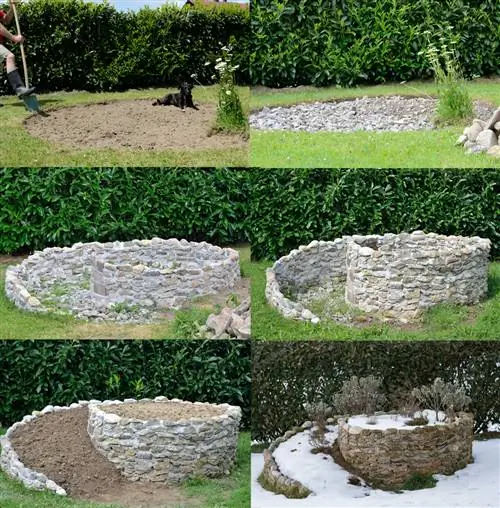
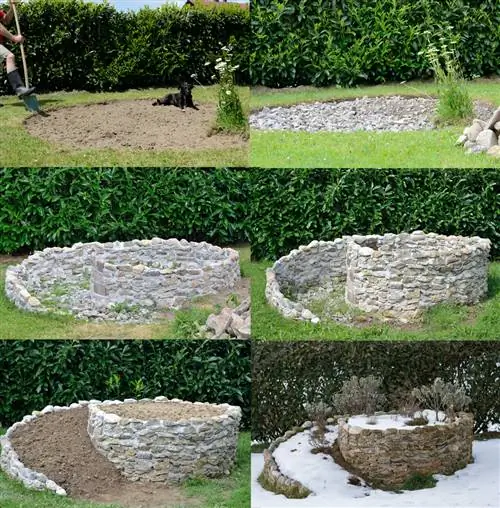
To build your own herb snail, choose a sunny location, prepare the base area and build a dry stone wall out of natural stones. Fill the spiral with different soil and sand mixtures according to the needs of the herbs and plant the different zones with suitable herbs.
Selection of location - tips for alignment
Choose a sunny, warm and wind-protected location in the garden for your herb snail. The most popular herb plants thrive in all their glory where they can bathe in light and warmth. The sophisticated structuring as a spiral facing south creates a microclimate in which Mediterranean sun worshipers and local forest herbs feel equally at home.
Material purchasing and tool requirements
These building instructions explain how you can build your own herb spiral out of natural stones with a small pond. The following materials and tools are required:
- Natural stones (at least as thick as a fist)
- Gravel, gravel and sand
- Herbal soil or garden soil, compost
- Wheelbarrow
- Shovel, rake, cultivator, hand shovel
- Wooden pegs, string
- Watering can
- Herbal plants
- Pond liner or pond tub
Use this guide as inspiration to bring your custom design plans to life. There are a variety of alternatives to choose from when designing the frame. Do you have a passion for modern garden design? Then use stone-filled gabions to give the herb spiral a stylish shape. Budget hunters use bricks or clinker bricks for the spiral wall.
Prepare the base area correctly - This is how it works
So that at least 10 to 12 of your favorite herbal plants can fit in the spiral, the base area should be generous. For a height of 80 cm and a diameter of 300 cm, please reserve an area of around 7 square meters in your garden. Stake the floor plan with strings and wooden stakes so that a snail shape is created that opens to the south. These instructions summarize how you can easily make the preparations yourself:
- Stick a long wooden stick into the ground in the center of the area
- Attach a string to it with a knotted wooden stick and draw a circle
- Within the circle, mark a spiral of 2 to 3 turns by sprinkling lime or light sand
- Dig the garden soil to the depth of a spade
- Spread a layer of gravel about 10 cm thick as a foundation for the wall and drainage to prevent waterlogging
Where the herb spiral opens to the south, mark the position for the small pond, which you also build yourself. Dig the soil at this point to a depth of around 40 cm in order to later lay out pond liner or use a pond tray. There is no layer of gravel here.
Build your own dry wall - construction instructions
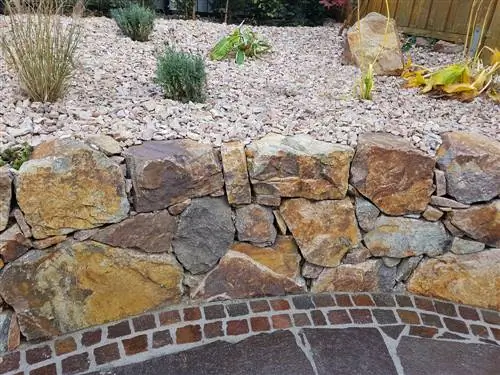
To build a dry stone wall, the natural stones are staggered and stacked without mortar. For the first row of walls, please use the largest stones and lay them on the gravel foundation along the markings. Each subsequent layer ends 50 cm earlier than the previous stone layer. Proceed in this way until the herb spiral has reached a height of 80 cm.
Wherever there are larger joints, you can later use plant bags to add additional herbs. This gardening trick increases the planting area, provides additional stability within the drywall and improves the appearance of your herb spiral. Numerous beneficial insects in the garden will appreciate the hiding places.
Fill the herb spiral correctly - this is how it works using the DIY process
An authentic herbal spiral extends across different moisture zones and areas of life. Mediterranean, sandy-dry conditions prevail in the upper region. The middle area is reserved for herbs that prefer partially shaded, moderately moist locations. The base with mini pond is reserved for shade-tolerant, water-loving herbs. With the correct filling you can professionally take these requirements into account. This is how it works:
- Fill the herb spiral from the inside out in stages
- Center: Mixture of garden soil and sand in a ratio of 1:1
- Middle area: one third each of garden soil, compost and sand
- Base: garden soil and compost in equal parts
At the lower end of the herb spiral, fill the pond depression with a 5 cm thick layer of sand. Lay the pond liner on top or insert the pond tray. Cover the edge of the small water world with natural stones or gravel. Spread nutrient-rich herb or garden soil as a substrate for the bank zone. Once the water is filled here, the perfect environment is created for watercress and other marsh herbs.
Planting herb snails skillfully - tips for the planting plan
Let about 14 days pass before planting your herb spiral so that the soil can settle. To ensure varied planting, we have put together these tips for your planting plan:
Upper Mediterranean Zone:
- Provence lavender (Lavandula x intermedia)
- Marjoram (Origanum majorana)
- Rosemary (Rosmarinus officinalis)
Central temperate zone:
- Lemon balm (Melissa officinalis)
- Chives (Allium schoenoprasum)
- Tarragon (Artemisia dracunculus)
Pond zone:
- Waternut (Trapa natans)
- Watercress (Nasturtium officinale)
- Watermint (Mentha aquatica)
Tip
When you plant garden herbs, it's not just the location that matters. Not all types of herbs know how to be good neighbors. Marjoram and thyme are at loggerheads. The dream teams in the herbal kingdom include fennel, coriander, tarragon and thyme. Among the annual herbs, dill, parsley and marjoram harmonize wonderfully.

